Experimenting
After doing the previous exercises I was ready to start weaving with yarn. I was really curious what textures could be created, this time not through the use of strange or unusual materials but by varying the weft. In the run up to this exercise I got incredibly lucky, I found a large Glimakra tapestry loom on the internet, including a bag full of bobbins and a book and it only cost me about 20 pounds! Setting up a warp without instructions was an interesting experience!
In my first sample I wanted to see how I could utilize the slits that appear when doing straight colour changes to create a more 3 dimensional piece. So I twisted the thin purple rectangles before weaving the wider part at the top of them. I think this creates nice dimensional effect.

This made me think a little more about colour changes, all weaving I have ever done or seen tells you to go up and down in the same colour so that you end up with your colour on the right side of the work. But what if I changed colour at every turn? I do like the subtlety of the arrow in this sample, I reversed colours halfway through which obviously didn’t affect the arrow, but did change the background.

Looking at the backside of my previous sample, gave me another idea for texture. Changing colour at every turn made long threads at the back of the arrow. (Of course this could have been eliminated by using two more weft threads, but I didn’t think it would be a problem on a small sample like this.) So I did another sample with the same technique, but did one stripe by changing colour at every turn and did the next one in mirror image, still changing the colour at every turn, but with the backside to the front. It wasn’t easy to coordinate my hands and brain for this one! But I think this could give a really nice texture to a piece.

For my final sample I wanted to try and create a more “open” weave. I did this by twisting the warp thread in between the weft.
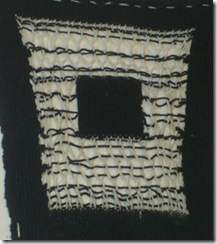
I did run into a problem here, I clearly couldn’t keep the tension right and the piece started to pull in a lot. Some research taught me that when using an open weave technique like this, suspenders are used to keep the work at the right width. But I do like the effect and I guess the whole reason to make samples is to learn about these things….
Posted by
Agnes Iley
8:06 AM
Did you enjoy inventing constructed surfaces? Where you surprised at the results? Can you see a connection between your choice of materials and the type of structures you made; for example regular, irregular, small or large scale? Which samples worked best and why?
I did enjoy constructing surfaces. The first paper samples I didn’t really inspire me. But when I did the sample with the butterfly I started to enjoy myself. That was when saw how this could translate to my textile work. The samples I like the most are the bike tire and the grid made with fabric strips and cords. The bike tire I like because of the unusual combination of materials that are opposites but complement each other well. The grid although being, glued together, not as sharp as I would like and very colourful for my taste, triggered my imagination the most with regards of future uses for this technique.
How successful where you in matching all the colours in your postcard? With paints? With yarns/other materials?
I think (or thought) at first I was quite successful at matching the colours from the picture, until I printed the picture a couple of days later. But in general I don’t think it’s difficult to match colours with paints. Sometimes I may end up with a lot of paint, because I keep mixing and adding colours. But in the end the match is there. With threads it’s a little more difficult, because I simply can’t run out to the shop for every colour. Unfortunately most sewing supply and yarn shops have shut their doors over here, so I sometimes have to make do with what I got. But I think I can get a long way, by mixing the colours I’ve got and sometimes just by going by the “feel” off a piece instead of the exact match. But this obviously depends on the project.
Posted by
Agnes Iley
8:02 AM
Working with paper and especially glue is never the most ins piring thing to me. So I started by cutting strips of paper and wove them in the most traditional way, interlacing them. So I made a solid rectangle, hardly revolutionary and this solid block of paper just didn’t do it for me. Maybe I needed to cut it again? Create a more open shape?
So I ended up with this, still not revolutionary, but a lot better than my starting point.
I found 2 fancy sheets of paper in my stash that had the same pattern, but in different colours. So what would happen if I cut them as duplicates, but with one paper rotated?

(Can you tell this was the point I started to have fun?)
I really liked the result of this and I can see this effect in some way will come back in my textile work in the future.
Now it was time to ditch the glue!
 I cut some strips of paper and warped a kid’s loom with chenille thread. Then I wove alternately with eyelash yarn and the paper strips. After taking the structure of the loom, there was a clear difference in tension, because of the variation in materials. And as I was playing around with it a bell shape was formed. (Well it’s Christmas after all).
For my next exercise I wanted to use some different materials. Now I must tell  you my husband is an avid cyclist and goes through an incredible amount of inner tubes. At some point I told him not to throw the old tubes away, but keep them for me. So I figured this was a good time to start using one of them. So I cut the tire open and made length way slits.
I really wanted to offset this hard, industrial looking material against something soft and delicate. So I got some fantasy yarn from my stash and a bit of vintage lace.
I also wanted to create a focal point, so experimented with making a narrow rubber tube that is covered with more fantasy yarn. I actually like this piece and I can see how with a bit of work this could make a great belt. If I was making a wearable piece I would stabilize the rubber first by bonding it to a canvas-type fabric and instead of tucking the edges under I would probably sew them in place.
For my last exercise something a little more colourful…

This is a grid made with some cords, a little fabric and some fabric wrapped skewers (for stabilization). This little sample is mostly glued together of little bits and bobs I had laying about and some cords I made. I know it doesn’t look like much, but I had fun playing. And it gave me a few ideas for future samples. I do like the open and airy feel. And it made me think about the rather traditional quilt where you get a number of pictorial blocks set in a framework of borders. I think it would be interesting to try and create blocks but set them in an open framework of cords and fabric strips.
Posted by
Agnes Iley
7:57 AM
I do enjoy these colour analyzing exercises. It’s something that would never have sprung to mind if I hadn’t done this course. And doesn’t only makes you think about the colours and the proportion of the colours in a picture. But it also forces you to look more in-depth into the image you are working with. I like that it gives me a little more time to reflect then I would usually take. In this case I worked with an image of Frida Kahlo’s self-portrait. Despite getting every bit of yarn and thread out that was lurking in my stash for the next exercise. I decided to go with embroidery threads. Firstly I’ve got those in more colours and tones and secondly I wanted to concentrate on proportion which, I figured, would be easier if I worked with consistent materials.

The question how to determine proportion did pop up, of course the proportion of colour is very different when you look from side to side then from when you look top to bottom. So I decided to go by “the feel” off the picture. ( I realize this is very subjective.)
I did learn one major lesson…
I worked on the image from my computer screen. Our printer had given up the ghost and we were waiting for the replacement printer. Colours on a screen are different then printed colours! So in my sketchbook the colours look just a little off, while they matched perfectly when I was working on it. Very annoying, but I decided not to manipulate the picture and take it as lesson learned!
Posted by
Agnes Iley
7:55 AM
The question of textile art, design or craft seems to be cause for constant lively discussions. When is something art? Is it the eye of the beholder that decides or the heart of the creator? I guess for the longest time it was the eye of the beholder after all, that eye decided what we could see in museums and galleries. But with the new media everyone can show their work in one way or another.
To me the difference is imagination. I can be totally in awe of the impeccable skills of a craftsperson, but what makes it art to me is the originality of the design and the innovative way those skills are used. Of course there is a fine line (or a big gray area) between the two. The first example that springs to mind is my favorite designer, the late Alexander McQueen. I own a pair of pants by him, they are beautifully cut and impeccably finished a perfect example of a great design, but art they are not. But when I look at his famous bird dress, not the most wearable thing in the world, I feel like I am looking at an amazing artwork. So is he a designer or an artist? To me he is both, not everything he made was art and not everything he made was design and I think a lot of artists cross that line quite regularly. The fabulous art quilter that starts to sell patterns, becomes a designer, but also remains to be an artist.
It’s always a fun subject for discussion, but at the same time I don’t particularly care about the outcome. To me art is both in the eye of the beholder and in the heart of the artist. And when those two meet that’s when the experience is magical.
I had a long think about which artist to pick, there are so many artist that are inspiring for so many different reasons. But I then I thought I wouldn’t go for the obvious.
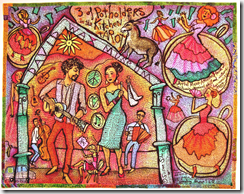
Susan Shie is an art quilter, but not in the traditional sense. Her pieces are paintings on cotton, covered in writing with airpen and then quilted. She calls her work “soft paintings”. Her pieces range from pastel in colour to very colourful and bright. Her smaller wall-hangings are painted with a paintbrush, for the larger pieces she uses an airbrush. Her images are quite naïve in style, but this is counteracted by the written thoughts. Her quilts are very far removed from anything I do and compared to my work very bright and cheerful. But the thing I really admire about Susan’s work is the loose and free way that she works. Where I plan and am meticulous about transferring designs. She draws freehand, paints in a very freely, overlapping colours, letting colours flow and finishes her piece with freehand writing. The writing doesn’t just show us her thoughts, it also gives the piece movement and shading. I know we all got our own way of working, but I would love to be able to work this freely once. Her work also reminds me that I really need to use my sketchbook more!
The second artist I choose is the absolutely opposite of Susan Shie and her obsession with detail scares the living daylights even out of me!
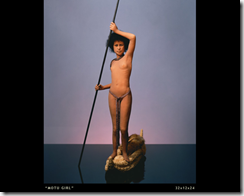
Lisa Lichtenfels is very famous in the art doll world and her work has exhibited in museums all over the world. Her soft sculptures are incredibly life-like. So much so that legend has it that a person who saw Lisa put one of her child figures in the boot of her car called the police and reported a kidnapping in progress. The sculptures vary in size, from 25 inches to life size. Lisa sculptures start with a wire skeleton that is incredibly precise, all the main bones in the human body are recreated, next she adds muscles by accurately recreating them in batting. Over this a layer of body-fat (also batting). And finally several layers of pantyhose to create the skin. Her precision and eye for detail are absolutely amazing. She has also been a great influence on my soft-sculptures. When I started to create 3-dimensional figures from textile, I started like most people with a pattern and I was working in cotton. But I got increasingly frustrated. I couldn’t create the emotions I wanted. I realized I had to use a different and stretchy material and could no longer work with patterns. Lisa’s sculptures where the first ones that proved to me that it could be done and although I chose a different way of creating “flesh and bones”, there is so much I have learned from her work. And I can only hope that one day my work will be as amazing as hers!

 I think I may have written earlier that although I am attracted to abstract art, my own work always has strong roots in reality.
 But after the assignments I’ve done so far and reading through the chapters of this one I kept thinking about shapes and moving space.
In particular with regards to this sample I did for the fabric dying exercises.
I was wondering about how the squares in the middle could be 3 dimensional cubes. Then circles came to mind and before I knew it I spent the next 2 weeks working with shapes.
Now I must tell you that my favorite answer to “what are you making?” is “oh….nothing”. And I’ll stick to that answer until I am finished.
However now……for the first time ever I can stick to that answer….after 2 weeks of trying, sampling and working I made absolutely nothing……
I know the execution could be better. If I would make this again the ball would be constructed differently. But I was very much working out how to construct whilst going along.
All the fabric has been tied and then bleached, the whole thing started out as black fabric. I made the outer frame from wood and covered this in felt and then I hand sewed the fabric around it, trying to keep the edges sharp.
The ball is suspended in mid-air by a framework of threads.
And the cubes were first sewn and then stuffed with little cardboard boxes for rigidity.
I know this “thing” doesn’t fit the brief of any of the exercises, that doesn’t matter.
I am happy with it and just wanted to show what effect this course has had on my way of “seeing things” already.
1 March 2011
For this project I didn’t have to think twice where my inspiration would come from. Throughout these assignments I have been fascinated by these two pictures, of a collar by Penny Fisher, in the course book:
I must start by saying that I love black pearls. And although the pearls in these pictures are not black, the anthracite fabric with it’s gentle sheen has the look and feel of black pearls.
I also love the way the way the fabric “embraces” the pearl, very much like the pearl inside a shell.
So for the subject of this assignment I was thinking shells, pearls and marine life in general.
As for the material…
I’ve always been fascinated by 3dimensional structures in fabric and for me the “holy grail” in 3D fabric structures would be to create a transparent structure in silk voile.
Of course this sounds like impossibility without some kind of support structure, but the support would spoil the transparency. I’ve tried various ways of stiffening the fabric over the past few years, but as most (all?) stiffeners are glue based, they will leave the fabric looking and feeling like plastic.
So at the moment the way I try to create structure and shape is by pleating folding and sewing. Which I know works for smaller shapes.
When I start thinking about how to create a certain shape, I often look at paper craft.
After all people who are working with paper are also trying to create shapes from something that started life as a flat sheet and as they benefit from the stiffness of the paper, I benefit from the pliability of fabric.
For this piece I needed to look at shells and luckily for me I discovered there is a lot of variety in oysters, mussels, scallops and even snails that can create pearls.
So this gave me some freedom in the shape of the shell I was going to create.
Here is an example of a scallop shell. Which has got quite a wavy “design”, I figured that I could sew narrow pleats to create the wavy feel, which at the same time would create structure.
I thought for a while about adding colour, but decided to pleat the bands going across the shell instead of colouring them.
The only colour in this piece was going to come from the “black pearls”.
The pearls are made from fabric that was free motion embroidered with a metallic thread.
And to finish of the “necklace” I created some seaweed from the same silk voile that was give structure and rigidity by stitching.


