 Once I had decided what form my piece would be. I could start working on my base figure. The human shape would be my base, the tree would be “build” around it later. Because I really wanted the tree and human to become one, I decided on a full body sculpt. In a strange way I wanted the legs to show through the tree trunk, but it still had to feel like a tree trunk. How? That was for later. For now I decided to focus on making my basic figure.
When I make my (human) soft sculptures I always start by making a wire frame. I make my frame against a print out of a skeleton, so I know I’ve got the proportions right. The frame gets then wrapped in strips off pre-felt. Pre-felt is a lightly needle felted wool, that just holds it’s shape enough to cut strips from. Whilst wrapping I check for proportions again, but this time against a muscle chart. After I wrapped the whole frame I start needle felting the wool. This is quite a labour intensive process, I keep sculpting the wool with felting needles until I reach the body shape I want.
(I must admit that the pictures shown here are not of my “Weeping Willow” sculpture. I forgot to take pictures whilst I was working on her. The pictures shown here are of another sculpt I did, but I thought they would explain the process much better than I could ever put into words.)
Posted by
Agnes Iley
8:19 AM
 Just because I had decided on my theme, didn’t make this picture less intimidating. So where to start? Going over my past coursework I decided to break it down in simple steps. I started with a colour analyzing exercise. With threads I tried to match the colours in the picture. Which was very helpful it didn’t only give me a palette, it also broke down the picture into something tangible. I am not sure if I am making sense here but the abstract and subjective feel of the picture, turned into reality and became objective. The next step was to decide what kind of soft sculpture I wanted to make. I should say here that I love Weeping Willows. The draping branches that gently rustle in the wind or get swept into frenzy by an autumn storm. But also the mythical properties of a Weeping Willow. Just the name alone is enough inspiration for some wonderful stories. With all this in my mind I decided to make a figure where the human form would morph with the tree.
Posted by
Agnes Iley
8:17 AM
When I thought about my design project when I started my theme book I knew what my inspiration would be. I collect pictures, on my computer I have a big folder of pictures, some I have taken myself, some are collected from the internet, some are postcards from museums, but all captured my eye at some point. In this folder there is also this picture:

Weeping Willow VII – Claude Monet
This picture I saved a long time ago and every time I looked at it I thought “I need to do something with that”. But I never knew what. I love the picture, but it always felt a little intimidating, difficult to grasp, to break down and turn into a useful source of inspiration. So I thought it would be a good test for me to see what I had learned during the course and how I could use the techniques when I ventured out on my own. Another thing I wanted to show for my final assignment is another side of my work, soft sculpture. I think my love for textural and 3 dimensional pieces must have shone through here and there in my work so far. But I thought maybe it was time to really push the boat out.
Posted by
Agnes Iley
8:15 AM
Did you have enough variety in your collection of yarns and other materials?
I do believe I have, at least enough to give me a good idea what the different textures do.
Which kind of yarns did you use most?
I mostly used thin wool and a wool/linen mix (Venne), because more than creating texture through the material used I wanted to see what I could achieve by using varying techniques.
How do their characteristics affect the look and feel of each sample.
The thinness of the wool allowed me work very precise the feel changed with the weaving technique. When woven loosely it looks and feels soft and fluffy, but when tightly woven it looks solid and feels quite rough.
How did you find weaving in comparison to the other techniques you have tried? Did you find it to slow or too limiting?
I must admit that probably about 15 years ago I tried weaving on a 4 shaft table loom. I made some fabric but found the process very repetitive and rather boring. Weaving on the tapestry loom, although in theory far more limited, I found much more exciting. Weaving with the thin wool is obviously a very slow process (hence the half vase), but it never got boring. I enjoyed myself. In comparison to the other techniques I will always go back to sewing and soft sculpture, but that doesn’t mean there isn’t a tapestry or two in my future…
How did you feel about the finished sample? Are you happy with the relationship of textures, proportions and colour and pattern to the finished size? Is there any part you would change? If so why would you change it.
I feel I finished quite a few samples, but don’t feel like I have got a “resolved” sample. Every piece I finished gave me the idea of “next time I must do this, or change that, or has given me more ideas to experiment. So I am quite happy with my samples as experiments, but there is not a finished, faultless piece there. I purposely chose very thin wool to work in, to try and see how detailed I could work. I also didn’t go for textured yarns, because it was too obvious to me what they would do. I really wanted to try and create pattern and texture by trying various techniques. Which has been fun, I learned a lot and it has been very time consuming. On one hand I am annoyed because I feel I should have finished this lesson with an amazing piece, on the other hand this has given me a new outlook on weaving. I like the process of tapestry weaving. Even if you have worked out your design on paper, you are still making design decisions, quite literally, on every turn. That keeps it engaging and interesting, even if the process is slow. I’ve got a lot more to learn about this. And that feeling made it difficult for me to decide when to stop. There are more experiments that are bugging me to be made. (For example, what would happen if you set up a double warp? Weaving the warp partially as one and partially single, I think interesting textures could be created that way.) But then I figured tapestry weaving is probably the most “alien” technique to me out of all the assignments (despite having woven before) and it takes more practice to get it perfect. As far as the proportions of the last sample with regards to colour and pattern I do think it works quite well. The pattern reminds of a grey autumn day in Holland, when you see the reeds sway in the wind.

Posted by
Agnes Iley
8:14 AM
Don’t run…..
My first attempt at developing my design ideas was a good reminder of the old saying “don’t run before you can walk”, but seeing as it taught me a lot I figured I need to own up…
 Usually I hate having pictures taken, but my husband was playing with a new app on his phone and came up with this picture of me that reminded me of some block prints by Edvard Munch I had recently seen. So I wondered if I could turn it into a tapestry. So I printed the picture, attached it to the loom and started weaving. All went reasonably well I thought. And I spent a long time w
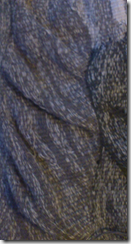 eaving the picture. Did I think that varying weaving direction would create bias fabric that would pucker? Of course not, And as long as the piece was under tension the problem wasn’t visible. But when I took it of the loom, disaster! I considered wetting the tapestry and blocking it with an iron. But then I thought that nothing would shrink that much!
However, I really want to try and utilize this puckering effect in the future. I like the texture it creates and surrounded by solid straight weave I can see it making a very interesting tapestry. Either in an abstract tapestry, where it would create texture or in a “picture tapestry” as a rolling sea with embroidered foam on the peaks.
 This piece had one other redeeming feature there was one corner that I liked and this was the base for my “Developing design ideas into weaving” – mark II.
Mark II
So I needed to rethink. One small corner of my “disaster” weave did appeal to me. But did I really want to weave another flat solid piece? Not really, so I wondered if I could weave a shape, sew it and turn it into a dimensional shape. So I decided on a (partial) vase. I drew the design inspired by the little corner of the previous work and started weaving.
Now this one had it’s challenges as well, especially were the design ran from one shape into the next. But I did learn from my previous mistakes and there was no 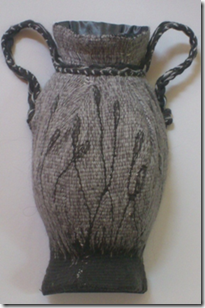 puckering this time! This little vase is woven with the thinnest wool I have ever seen, 2-ply Venne wool in 3 shades of grey. I doubled up on the wool mixing the colours. When I finished weaving and started to sew in the darts that would give it it’s shape, I had another “duh”-moment. I realized I could have just pulled the warp threads and that there wouldn’t have been any need for the darts! I lined the little vase with some fabric and pelmet Vilene. I made the handle by plaiting 8 double threads around some wire and backing this with a cord made of the same yarn.
Posted by
Agnes Iley
8:09 AM
Experimenting
After doing the previous exercises I was ready to start weaving with yarn. I was really curious what textures could be created, this time not through the use of strange or unusual materials but by varying the weft. In the run up to this exercise I got incredibly lucky, I found a large Glimakra tapestry loom on the internet, including a bag full of bobbins and a book and it only cost me about 20 pounds! Setting up a warp without instructions was an interesting experience!
In my first sample I wanted to see how I could utilize the slits that appear when doing straight colour changes to create a more 3 dimensional piece. So I twisted the thin purple rectangles before weaving the wider part at the top of them. I think this creates nice dimensional effect.

This made me think a little more about colour changes, all weaving I have ever done or seen tells you to go up and down in the same colour so that you end up with your colour on the right side of the work. But what if I changed colour at every turn? I do like the subtlety of the arrow in this sample, I reversed colours halfway through which obviously didn’t affect the arrow, but did change the background.

Looking at the backside of my previous sample, gave me another idea for texture. Changing colour at every turn made long threads at the back of the arrow. (Of course this could have been eliminated by using two more weft threads, but I didn’t think it would be a problem on a small sample like this.) So I did another sample with the same technique, but did one stripe by changing colour at every turn and did the next one in mirror image, still changing the colour at every turn, but with the backside to the front. It wasn’t easy to coordinate my hands and brain for this one! But I think this could give a really nice texture to a piece.

For my final sample I wanted to try and create a more “open” weave. I did this by twisting the warp thread in between the weft.
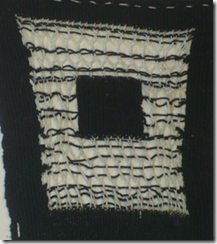
I did run into a problem here, I clearly couldn’t keep the tension right and the piece started to pull in a lot. Some research taught me that when using an open weave technique like this, suspenders are used to keep the work at the right width. But I do like the effect and I guess the whole reason to make samples is to learn about these things….
Posted by
Agnes Iley
8:06 AM
Did you enjoy inventing constructed surfaces? Where you surprised at the results? Can you see a connection between your choice of materials and the type of structures you made; for example regular, irregular, small or large scale? Which samples worked best and why?
I did enjoy constructing surfaces. The first paper samples I didn’t really inspire me. But when I did the sample with the butterfly I started to enjoy myself. That was when saw how this could translate to my textile work. The samples I like the most are the bike tire and the grid made with fabric strips and cords. The bike tire I like because of the unusual combination of materials that are opposites but complement each other well. The grid although being, glued together, not as sharp as I would like and very colourful for my taste, triggered my imagination the most with regards of future uses for this technique.
How successful where you in matching all the colours in your postcard? With paints? With yarns/other materials?
I think (or thought) at first I was quite successful at matching the colours from the picture, until I printed the picture a couple of days later. But in general I don’t think it’s difficult to match colours with paints. Sometimes I may end up with a lot of paint, because I keep mixing and adding colours. But in the end the match is there. With threads it’s a little more difficult, because I simply can’t run out to the shop for every colour. Unfortunately most sewing supply and yarn shops have shut their doors over here, so I sometimes have to make do with what I got. But I think I can get a long way, by mixing the colours I’ve got and sometimes just by going by the “feel” off a piece instead of the exact match. But this obviously depends on the project.


